
There are better options than using one array for names and another array for resources.
I encounter a piece of code which bugs me:
int[] images = {
		R.drawable.ic_image_1, R.drawable.ic_image_2, R.drawable.ic_image_3, R.drawable.ic_image_4, R.drawable.ic_image_5
		R.drawable.ic_image_6, R.drawable.ic_image_7, R.drawable.ic_image_8, R.drawable.ic_image_9, R.drawable.ic_image_10
};

String[] imagesNames = {
	"Image One", "Image Two", "Image Three", "Image Four", "Image Five",
	"Image Six", "Image Seven", "Image Eight", "Image Nine", "Image Ten"
};
Later on, these two array are pass to all kind of method and constructors together for example:
    @Override
    public void onBindViewHolder(MasonryView holder, int position) {
        holder.textView.setText(imagesNames[position]);
        holder.imageView.setImageResource(images[position]);
    }
While this is correct, light on the memory, and use fewer CPU resources (less like of code run, smaller Big O), it welcomes all short of possible bugs, for example, lets say you add an image and forgot to add a name. You get mismatch arrays. Your code breaks. This issue is common if you are building these arrays dynamically; therefore, why not keeping the information together?
There are different ways to handle this
One way would be to create a class which holds these two items (image and image name). Then, you can create an array of objects.
private class Resource {
	public int image;
	public String name;
	Resource(String name, int image){
		this.image = image;
		this.name = name;
	}
}

Resource[] resources = {
	new Resources("Image One", R.drawable.ic_image_1),
	new Resources("Image Two", R.drawable.ic_image_2),
	new Resources("Image Three", R.drawable.ic_image_3),
	...
	new Resources("Image Ten", R.drawable.ic_image_10),
}
Then, you can iterate them:
    @Override
    public void onBindViewHolder(MasonryView holder, int position) {
        holder.textView.setText(resources[position].name);
	    holder.imageView.setImageResource(resources[position].image);
    }
Now, this is cleaner than before.
However, lets say you don’t wish to use a (public or private) class, then what to do? Well, you could use our old friend LinkedHashMap, which works like a HashMap; however, it keeps the order in which the elements were inserted into it.
LinkedHashMap = new LinkedHashMap<String, Integer>();
resources.put("One", R.drawable.ic_image_1);
resources.put("Two", R.drawable.ic_image_2);
...
resources.put("Ten", R.drawable.ic_image_10);
Now, here there is a problem. While you can iterate each of these items and get them based on the key (name), you cannot access them with an index. Do not despair! There is a solution around it by using the entrySet() method which is offer with the LinkedHashMap. The entrySet() method returns a set view of the mappings contained in the map. Lets see how it can help us:
resourcesIndexed = new ArrayList<Map.Entry<String, Integer>>(resources.entrySet());

    @Override
    public void onBindViewHolder(MasonryView holder, int position) {
        holder.textView.setText(resourcesIndexed.get(position).getKey());
        holder.imageView.setImageResource(resourcesIndexed.get(position).getValue());
    }
As you can see, without creating a container, such as a class, we can use an index to obtain the information and keep track of each pair.
JSF: PrimeFaces: JPA: Multiple Persistence Units
Problem
When using multiple JPA persistent units inside the file persistence.xml you can run into troubles when your entities have the same name. A exception message such a follow is an indicator of that there is a problem: “javax.annotation.processing.FilterException: Attempt to recreate a file …”
Solution
Set the following property from
<exclude-unlisted-classes>false</exclude-unlisted-classes>
to
<exclude-unlisted-classes>true</exclude-unlisted-classes>
JSF: PrimeFaces: Basic Custom Composite Component
The following describe how to create a basic custom composite component in JSF 2.0+ for Primefaces. The method of using rendering classes, back beans, type classes, and others are not included in this tutorial. Please note that the IDE used for programming is NetBeans 7.4
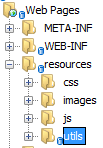
- Create a Folder
Create a subfolder into the resources folder as show in the following image. In this case, we call this folder “utils”.
- Create a XHTML File
Inside the folder utils, lets cretae a XHTML file. This file will contain our custom composite component.
In this case, we call this file “displaySuperValue.xhtml” - File “displaySuperValue.xhtml” Content
Copy and Paste this code example:<?xml version="1.0" encoding="UTF-8"?> <!DOCTYPE html> <html xmlns="http://www.w3.org/1999/xhtml" xmlns:h="http://xmlns.jcp.org/jsf/html" xmlns:composite="http://java.sun.com/jsf/composite"> <head><title>Show Super Value</title></head> <body> <composite:interface> <composite:attribute name="supervalue" required ="true" /> </composite:interface> <composite:implementation> <h
 utputText value="This is SuPeR: #{cc.attrs.supervalue}" />
</composite:implementation>
</body>
</html>
utputText value="This is SuPeR: #{cc.attrs.supervalue}" />
</composite:implementation>
</body>
</html> - About Your Custom Component
At the beginning of your file, you will need to include the composite namespace if the IDE did not include it automatically. Just add the following line:xmlns:composite=”http://java.sun.com/jsf/composite”
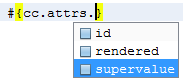
While the interface tag should hold all the attributes of your custom tag, the implementation tag should hold all your web interface script. In order use the attributes declared inside the interface tag, you need to use the “cc” bean provided by JSF. This bean is based on the UIComponent class.
- Implementing Your Custom Composite Component
Go to the XHTML file which you wish to use your custom composite component.
Start typing as you normally would do when writing a JSF tag by typing the name of the folder you created under the resources folder as show below:
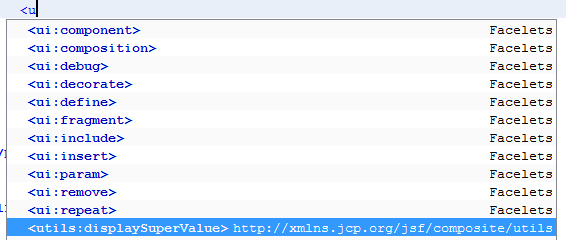 While “utils” is the name of the folder, “displaySuperValue” is the name of the XHTML file you created.
As you keep typing, when using the space, the NetBeans IDE will display a list of all the default attributes including those you created inside the interface tag. Normally, the NetBeans IDE should include the namespace that will allow you to access to your custom component; however, if the IDE doesn’t include the namespace, just add the following namespace and the problem should be solved:xmlns:utils="http://xmlns.jcp.org/jsf/composite/utils"
PrimeFaces: Using Included JQuery
PrimeFaces is already shipped with the jQuery bundled; therefore, there is no need to include the jQuery script.
However, when in a page there are no PrimeFaces components that use jQuery then jQuery will not be automatically included.
To go around this issue, you must use the following line inside the <h:head> tag:
<h