iOS and OpenGL ES Programming – Part 3

< Previous (iOS Programming – Part 2) | (iOS Programming – Part 4) Next >

The next class we are going to analyze is EAGLView. The prefix EAGL means Embedded Apple OpenGL. EAGLView class is the kernel of this application. Its responsability is to provide the OpenGL ES context which shall allow us to render on device’s screen.

EAGLView.h

//
//  EAGLView.h
//  OpenGLES_iPhone
//
//  Created by mmalc Crawford on 11/18/10.
//  Copyright 2010 Apple Inc. All rights reserved.
//

#import <UIKit/UIKit.h>
#import <OpenGLES/ES1/gl.h>
#import <OpenGLES/ES1/glext.h>
#import <OpenGLES/ES2/gl.h>
#import <OpenGLES/ES2/glext.h>

@class EAGLContext;

// This class wraps the CAEAGLLayer from CoreAnimation into a convenient UIView subclass.
// The view content is basically an EAGL surface you render your OpenGL scene into.
// Note that setting the view non-opaque will only work if the EAGL surface has an alpha channel.
@interface EAGLView : UIView {
@private
    // The pixel dimensions of the CAEAGLLayer.
    GLint framebufferWidth;
    GLint framebufferHeight;

    // The OpenGL ES names for the framebuffer and renderbuffer used to render to this view.
    GLuint defaultFramebuffer, colorRenderbuffer;
}

@property (nonatomic, retain) EAGLContext *context;

- (void)setFramebuffer;
- (BOOL)presentFramebuffer;

@end

In the following headers import you may notice that we have ES1 and ES2. ES1 correspond to OpenGL 1.0 while ES2 correspond to OpenGL ES 2.0

#import <OpenGLES/ES1/gl.h>
#import <OpenGLES/ES1/glext.h>
#import <OpenGLES/ES2/gl.h>
#import <OpenGLES/ES2/glext.h>

@class EAGLContext; is a forward declaration of the class EAGLContent that should be imported later on someone in the project.

The class EAGLView inherits the class UIView. The UIView class belongs to the UIKit is a framework which provides all classes we needed to construct and manage the application’s user interface. Also, it provides an application object, drawing model, windows, views, and controls for the touch screen interface.

@interface EAGLView : UIView {


EAGLView.m

//
//  EAGLView.m
//  OpenGLES_iPhone
//
//  Created by mmalc Crawford on 11/18/10.
//  Copyright 2010 Apple Inc. All rights reserved.
//

#import <QuartzCore/QuartzCore.h>
#import 'EAGLView.h'

@interface EAGLView (PrivateMethods)
- (void)createFramebuffer;
- (void)deleteFramebuffer;
@end

@implementation EAGLView

@synthesize context;

// You must implement this method
+ (Class)layerClass
{
    return [CAEAGLLayer class];
}

//The EAGL view is stored in the nib file. When it's unarchived it's sent -initWithCoder:.
- (id)initWithCoderFrownNSCoder*)coder
{
    self = [super initWithCoder:coder];
	if (self) {
        CAEAGLLayer *eaglLayer = (CAEAGLLayer *)self.layer;

        eaglLayer.opaque = TRUE;
        eaglLayer.drawableProperties = [NSDictionary dictionaryWithObjectsAndKeys:
                                        [NSNumber numberWithBool:FALSE], kEAGLDrawablePropertyRetainedBacking,
                                        kEAGLColorFormatRGBA8, kEAGLDrawablePropertyColorFormat,
                                        nil];
    }

    return self;
}

- (void)dealloc
{
    [self deleteFramebuffer];
    [context release];
    [super dealloc];
}

- (void)setContextFrownEAGLContext *)newContext
{
    if (context != newContext) {
        [self deleteFramebuffer];

        [context release];
        context = [newContext retain];

        [EAGLContext setCurrentContext:nil];
    }
}

- (void)createFramebuffer
{
    if (context && !defaultFramebuffer) {
        [EAGLContext setCurrentContext:context];

        // Create default framebuffer object.
        glGenFramebuffers(1, &defaultFramebuffer);
        glBindFramebuffer(GL_FRAMEBUFFER, defaultFramebuffer);

        // Create color render buffer and allocate backing store.
        glGenRenderbuffers(1, &colorRenderbuffer);
        glBindRenderbuffer(GL_RENDERBUFFER, colorRenderbuffer);
        [context renderbufferStorage:GL_RENDERBUFFER fromDrawableFrownCAEAGLLayer *)self.layer];
        glGetRenderbufferParameteriv(GL_RENDERBUFFER, GL_RENDERBUFFER_WIDTH, &framebufferWidth);
        glGetRenderbufferParameteriv(GL_RENDERBUFFER, GL_RENDERBUFFER_HEIGHT, &framebufferHeight);

        glFramebufferRenderbuffer(GL_FRAMEBUFFER, GL_COLOR_ATTACHMENT0, GL_RENDERBUFFER, colorRenderbuffer);

        if (glCheckFramebufferStatus(GL_FRAMEBUFFER) != GL_FRAMEBUFFER_COMPLETE)
            NSLog(@'Failed to make complete framebuffer object %x', glCheckFramebufferStatus(GL_FRAMEBUFFER));
    }
}

- (void)deleteFramebuffer
{
    if (context) {
        [EAGLContext setCurrentContext:context];

        if (defaultFramebuffer) {
            glDeleteFramebuffers(1, &defaultFramebuffer);
            defaultFramebuffer = 0;
        }

        if (colorRenderbuffer) {
            glDeleteRenderbuffers(1, &colorRenderbuffer);
            colorRenderbuffer = 0;
        }
    }
}

- (void)setFramebuffer
{
    if (context) {
        [EAGLContext setCurrentContext:context];

        if (!defaultFramebuffer)
            [self createFramebuffer];

        glBindFramebuffer(GL_FRAMEBUFFER, defaultFramebuffer);

        glViewport(0, 0, framebufferWidth, framebufferHeight);
    }
}

- (BOOL)presentFramebuffer
{
    BOOL success = FALSE;

    if (context) {
        [EAGLContext setCurrentContext:context];

        glBindRenderbuffer(GL_RENDERBUFFER, colorRenderbuffer);

        success = [context presentRenderbuffer:GL_RENDERBUFFER];
    }

    return success;
}

- (void)layoutSubviews
{
    // The framebuffer will be re-created at the beginning of the next setFramebuffer method call.
    [self deleteFramebuffer];
}

@end

As you may notice we are importing QuazCore.

#import <QuartzCore/QuartzCore.h>

The QuazCore is a framework which provide us with access to Core Animation and other effects. The Core Animation provide us a layer which allow OpenGL commands to render with optimal performance.

In Objective-C there is not thing such as private method. However, that doesn’t mean that you cannot specify that something should be considerate private.

@interface EAGLView (PrivateMethods)
- (void)createFramebuffer;
- (void)deleteFramebuffer;
@end

Some people considerate this a hack created especially for Objective-C. Objective-C is purely dynamic. This means that the moment of method dispatch the exact same dynamic method resolution point as every other method dispatch. What does this means? This means that at runtime, every method implementation has the same exposure. Every method implementation of the APIs provided at runtime will work with methods and selectors equally the same across all methods. However, indicating that something is private and shouldn’t be used outside is a way to enforce some discipline from the programmer. As you may see, createFrameBuffer and deleteFrameBuffer must be considerate private and being used as such.

The following line indicate the compiler to create the getter and setter for context:

@synthesize context;

Next, we declare the method layerClass. This method shall override the layerClass method inherit from the UIView class.

+ (Class)layerClass
{
    return [CAEAGLLayer class];
}

This method must return the class CAEAGLLayer because this class is a wrapper for a Core Animation surface. CAEAGL means Core Animation Embedded Apple OpenGL. The CAEAGLLayer class provide us with support for drawing OpenGL content.

The initWithCoder method will be the first method to be called.

- (id)initWithCoderFrownNSCoder*)coder
{
    self = [super initWithCoder:coder];
	if (self) {
        CAEAGLLayer *eaglLayer = (CAEAGLLayer *)self.layer;

        eaglLayer.opaque = TRUE;
        eaglLayer.drawableProperties = [NSDictionary dictionaryWithObjectsAndKeys:
                                        [NSNumber numberWithBool:FALSE], kEAGLDrawablePropertyRetainedBacking,
                                        kEAGLColorFormatRGBA8, kEAGLDrawablePropertyColorFormat,
                                        nil];
    }

    return self;
}

In this method, the parent’s initWithCoder method is called first. if the object returned match then we assign it to the self property. Later, we point with eagleLayer pointer to the object’s CAEAGLLayer.

The property opaque of the object’s pointed by eaglLayer is set to TRUE. This means that we are not going to allow the rendering to be transparent. This will provide us with a good performance since allowing CAEAGLLayer object to be transparent would require a lot of blending to the content behind the layer.

Next, we are setting drawableProperties. This property allow us to provide a dictionary of objects and keys. They specify when the drawable surface will retain its contents after displaying them. Plus it will set the internal color buffer format which will be used for the drawable surface. This may seems complicated but it is not. Lets brake it down so we can understand.

NSDictionary is a class which declares the programmatic interface to objects. These objects will be a manager of  immutable associations of keys and values. dictionaryWithObjectsAndKeys is a class method which belongs to NSDictionary class. dictionaryWithObjectAndKeys method shall creates a dictionary which containing entries constructed from the specified set of values and keys and then return it. In order to return us this dictionary, we need to provide some arguments to dictionaryWithObjectsAndKeys. The first value is [NSNumber numberWithBool:FALSE], numberwithBool is a class method from NSNumber class. Since the its argument is set to FALSE, numberWithBool will create an NSNumber object containing a given value (FALSE) and treating this value as a BOOL.Then it will return us this NSNumber Object which will be used as the first parameter of dictionaryWithObjectsAndKeys. This first parameter is actually the first value that we will add to this new dictionary. kEAGLDrawablePropertyRetainedBacking, kEAGLColorFormatRGBA8, kEAGLDrawablePropertyColorFormat, are other values that are going to be added. kEAGLDrawablePropertyRetainedBacking is the first key and it is set to ‘false’. This key, kEAGLDrawablePropertyRetainedBacking, determine whether the surface retains whatever is drawn on it which means the layer won’t autorefresh its contents.  kEAGLColorFormatRGBA8 indicates that we are setting the template to a 16 bit RGB with Alpha. kEAGLDrawablePropertyColorFormat sets the internal color buffer for the layer. nil is used to indicate that we null-terminated the list of alternating values and keys.

Finally, initWithCoder method return the object self.

(To be continued…)

< Previous (iOS Programming – Part 2) | (iOS Programming – Part 4) Next >

References

  • http://developer.apple.com/library/IOS/#documentation/UIKit/Reference/UIKit_Framework/_index.html
  • Daley, Michael. Learning iOS Game Programming. Boston, MA: Pearson Education, 2010
  • http://developer.apple.com/library/ios/#DOCUMENTATION/QuartzCore/Reference/CAEAGLLayer_Class/CAEGLLayer/CAEGLLayer.html
  • http://developer.apple.com/library/mac/#documentation/cocoa/reference/foundation/classes/nsdictionary_class/Reference/Reference.html
  • http://developer.apple.com/library/mac/#documentation/Cocoa/Reference/Foundation/Classes/nsnumber_Class/Reference/Reference.html
  • http://www.visualnewt.com/OpenGL/learning_iphones_opengl_es/part_ii_-_the_iphone_opengl.html
  • http://developer.apple.com/library/ios/#DOCUMENTATION/iPhone/Reference/EAGLDrawable_Ref/EAGLDrawable/EAGLDrawable.html

Notification

These examples are provided for educational purposes. Using this code is under your own responsibility and risk. The code and information is given ‘as is’. I do not take responsibilities of how they are used.

Share
Leave a comment

iOS and OpenGL ES Programming – Part 2

< Previous (iOS Programming – Part 1) | (iOS Programming – Part 3) Next >

If you haven’t created your own project yet with XCode please go to the part 1 of this tutorial: iOS Programming – Part 1

In this part, we are going to analyse the files that were generated by XCode when we created our project.

I am assuming that you have some knowledge in C/C++ and also about terms normally used in programming languages.
Either way, I will try to provide you with links and/or explanations of terms that I will be using.

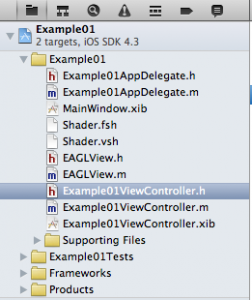
  1. At your left you can see the files created by XCode:
  2. In Objective-C there are two kind of files. Files with the extension .h are called header files. Files with the extension .m are implementation files.

Example01AppDelegate.h

//
//  Example01AppDelegate.h
//  Example01
//
//  Created by Alejandro G. Carlstein Ramos Mejia on 9/24/11.
//  Copyright 2011 Alejandro G. Carlstein Ramos Mejia. All rights reserved.
//

#import <UIKit/UIKit.h>

@class Example01ViewController;

@interface Example01AppDelegate : NSObject <UIApplicationDelegate> {
    UIWindow *window; // Added
    Example01ViewController *viewController; // Added
}

@property (nonatomic, retain) IBOutlet UIWindow *window;
@property (nonatomic, retain) IBOutlet Example01ViewController *viewController;

@end

#import <UIKit/UIKit.h> is the header of the library UIKit framework. The UIKit framework are a set of classes, objects, event handling, windows, views and controls that allow you to create and administrate your application’s user interface.

@class Example01ViewController; is a forwarding declaration. A forwarding declaration tells the compiler that we will be using this class and we shall import it somewhere later. This reduce the changes of doing circular references.

@interface Example01AppDelegate : NSObject <UIApplicationDelegate>{
    UIWindow *window;
    Example01ViewController *viewController
}

@interface keyword indicate that we will be declaring the interface of our class. In this case, the name of our class is Example01AppDelegate.
This class will inherit the class NSObject and will be using the protocol UIApplicationDelegate. A class is a blueprint for creating one or more objects.

UIWindow *window; creates a pointer of type UIWindow. The UIWindow class provide methods that allow us to administrate the windows our application will displays on the screen and distribute the events to the views.

Example01ViewController *viewController; creates a pointer (similar to pointer in C/C++) of type Example01ViewController class which is a class listed in our project.  A view controller allow us to manage the view and help us with navigation and memory management. We shall analyse this class later.

@property (nonatomic, retain) IBOutlet UIWindow *window;
@property (nonatomic, retain) IBOutlet Example01ViewController *viewController;

@property keyword allows us to declare a getter and setter accessor methods used for encapsulation, so we don’t have to write them. Inside the parenthesis we put the property attributes. In this case, we use nonatomic which indicates the compiler not to worry about multithreading. Also, we use retain which indicates the compiler to retain that we will take care of managing the passed-in variable before setting the instance variable. IBOutlet is a macro which defined variables and methods that can be referred to the Interface Builder.

@end

@end indicates that this is the end of our class definition

Example01ViewController.m

//
//  Example01AppDelegate.m
//  Example01
//
//  Created by Alejandro G. Carlstein Ramos Mejia on 9/24/11.
//  Copyright 2011 Alejandro G. Carlstein Ramos Mejia. All rights reserved.
//

#import 'Example01AppDelegate.h'
#import 'EAGLView.h'
#import 'Example01ViewController.h'

@implementation Example01AppDelegate

@synthesize window=_window;
@synthesize viewController=_viewController;

- (BOOL)applicationFrownUIApplication *)application didFinishLaunchingWithOptions:
(NSDictionary *)launchOptions
{
    // Override point for customization after application launch.
    self.window.rootViewController = self.viewController;
    return YES;
}

- (void)applicationWillResignActiveFrownUIApplication *)application
{
    /*
     Sent when the application is about to move from active to inactive state. This can occur for certain types of temporary interruptions (such as an incoming phone call or SMS message) or when the user quits the application and it begins the transition to the background state.
     Use this method to pause ongoing tasks, disable timers, and throttle down OpenGL ES frame rates. Games should use this method to pause the game.
     */
    [self.viewController stopAnimation];
}

- (void)applicationDidEnterBackgroundFrownUIApplication *)application
{
    /*
     Use this method to release shared resources, save user data, invalidate timers, and store enough application state information to restore your application to its current state in case it is terminated later.
     If your application supports background execution, this method is called instead of applicationWillTerminate: when the user quits.
     */
}

- (void)applicationWillEnterForegroundFrownUIApplication *)application
{
    /*
     Called as part of the transition from the background to the inactive state; here you can undo many of the changes made on entering the background.
     */
}

- (void)applicationDidBecomeActiveFrownUIApplication *)application
{
    /*
     Restart any tasks that were paused (or not yet started) while the application was inactive. If the application was previously in the background, optionally refresh the user interface.
     */
    [self.viewController startAnimation];
}

- (void)applicationWillTerminateFrownUIApplication *)application
{
    /*
     Called when the application is about to terminate.
     Save data if appropriate.
     See also applicationDidEnterBackground:.
     */
    [self.viewController stopAnimation];
}

- (void)dealloc
{
    [_window release];
    [_viewController release];
    [super dealloc];
}

@end

Lets begin analyzing this file.

@synthesize window=_window;
@synthesize viewController=_viewController;

The @synthesize keyword tells the compiler to create a getter and setter for (in this case) the variables (also called ivars) window and viewController.

- (BOOL)applicationFrownUIApplication *)application didFinishLaunchingWithOptions:
(NSDictionary *)launchOptions
{
    // Override point for customization after application launch.
    self.window.rootViewController = self.viewController;
    return YES;
}

First, you may notice the hyphen “-”  in front of (BOOL). The hyphen “-” is to indicate that this is for an instance method. If you will see a plus “+” sign instead, this would indicate that this is a class method (similar to static in C++).

(BOOL) indicates what is going to be returned from the method. This type can be set to YES or NO (different to the keyword bool used in C++, which can be set in true or false).

application is the name of the method. The colon “:” after application is to indicate that the following are going to be the declaration of the parameters of the method.

(UIApplication *)application is a parameter of type UIApplication pointer the same as (NSDictionary *)launchOptions is a parameter too; however, you may notice that after application we have didFinishLaunchingWithOptions. didFinishLaunchingWithOptions is a parameter label. Parameter labels are used to differentiate methods with the same name but instead of doing it base on their types (as in C/C++), they are being differentiated by labels instead. They are the replacement of “pointers on member functions”. Pointers on member functions are expressed as Selector in Objective-C.

- (void)applicationWillResignActiveFrownUIApplication *)application
{
    /*
     Sent when the application is about to move from active to inactive state. This can occur for certain types of temporary interruptions (such as an incoming phone call or SMS message) or when the user quits the application and it begins the transition to the background state.
     Use this method to pause ongoing tasks, disable timers, and throttle down OpenGL ES frame rates. Games should use this method to pause the game.
     */
    [self.viewController stopAnimation];
}

Again you can see that this method is an instance method due the hyphen “-” used at the beginning. The name of the method is applicationWillResignActive and this method have one parameter application which is a pointer of type UIApplication.

As explained in the header of this class:

@interface Example01AppDelegate : NSObject <UIApplicationDelegate>

Example01AppDelegate is a class that inherits NSObject and use UIApplicationDelegate protocol.

The following are methods that are implemented in this class that are delegate methods from UIApplicationDelegate. These methods respond to the messages sent by the default notification center:

  • applicationWillResignActive: called before the application is deactivated, for example: The Home button is pressed by the user.
  • applicationDidEnterBackground: called after application begin working in the background
  • applicationWillEnterForeground: called before application gain focus again and stop working in the background.
  • applicationDidBecomeActive: called after the application becomes active.
  • applicationWillTerminate: called before the application terminates.

[self.viewController stopAnimation]; is calling the method stopAnimation which belongs to the object viewController that we are pointing at.

Finally, the dealloc method:

- (void)dealloc
{
    [_window release];
    [_viewController release];
    [super dealloc];
}

This is a method that we need to include in every class. As you may notice. we are relasing window and viewController to free memory, and we are calling the dealloc method of the superclass NSObject which we inherit. Almost every class in Objective-C inherits from NSObject, NSObject have the basic interface to the runtime system and allow them to behave as Objective-C objects. It provide allocation and initialization. Just to make sure, in cocoa touch, there is no garbage collection. The dealloc method is normally called when a class is no longer needed and its “retain counter” has reached zero.

< Previous (iOS Programming – Part 1) | (iOS Programming – Part 3) Next >

References

  • http://www.acarlstein.com/?p=996
  • http://www.raywenderlich.com/2712/using-properties-in-objective-c-tutorial
  • http://stackoverflow.com/questions/588866/atomic-vs-nonatomic-properties
  • http://stackoverflow.com/questions/1703943/what-does-the-retain-message-mean
  • http://en.wikipedia.org/wiki/Circular_reference#In_computer_programming
  • http://developer.apple.com/library/ios/#documentation/uikit/reference/UIWindow_Class/UIWindowClassReference/UIWindowClassReference.html
  • http://en.wikipedia.org/wiki/Encapsulation_(object-oriented_programming)
  • http://developer.apple.com/library/ios/#DOCUMENTATION/iPhone/Conceptual/iPhone101/Articles/03_AddingViewController.html
  • http://pierre.chachatelier.fr/programmation/objective-c.php

Notification

These examples are provided for educational purposes. Using this code is under your own responsibility and risk. The code and information is given ‘as is’. I do not take responsibilities of how they are used.
 

Share
Leave a comment

iOS and OpenGL ES Programming – Part 1

After finish my last project, Cupid-4-Stupid, for the Android Market, I decided to play around the iPhone/iTouch.

I have many books and tutorial at my disposal; however, most of them do not reflex the changes that Objective-C have being doing. I will be adding references as a work cities at the end of the posting

Even do most of the code seems to work, many produce warning all around; so, I have to do what I do best… improvise.

I am going to post the different steps I am taking in order to learn how to program on iOS and OpenGL using XCode and Objective-C.

Just to clarify, iOS use OpenGL ES which is a lite version of OpenGL. At the momento of writing this post there are two versions of OpenGL ES: OpenGL ES 1.0 (ES1) and OpenGL ES 2.0 (ES2).

I bought XCode version 4.0.2. It cost me around 5 dollars. Later on, I found out the negative reviews that this version had generated. I am hoping that soon Apple address all the issues that people are complaining around the web.

(I am assuming that you have this version installed in your computer)

First lets create a new application:

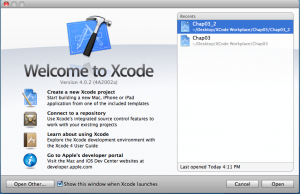
  1. Open the application by clicking here
     
  2. Select the option [Create a new Xcode project]
     
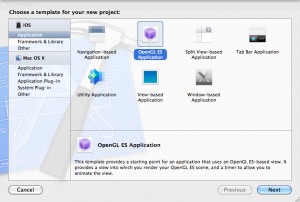
  3. Select OpenGL ES Application

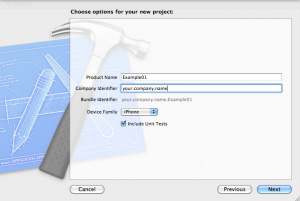
  4. Fill the information such as product name (Example 01), company name (your.company.name), and the device family (iphone)

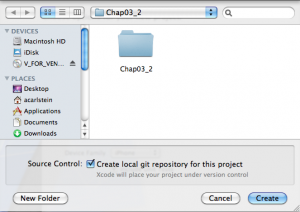
  5. A window will show up asking you where to save the project. Press [New Folder]
     
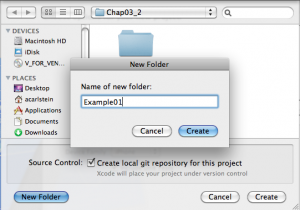
  6. Type the name of the folder (Example01) that will hold your project
     
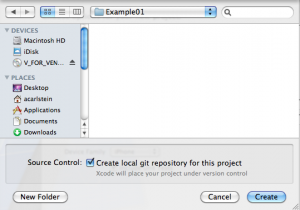
  7. Access to the folder that you created and press the button [Create]
     
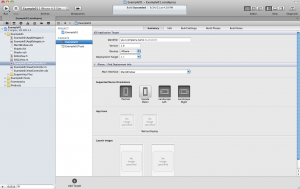
  8. Now you should see what I call the workbench, where you will be working on.
  9. If you press [Run]

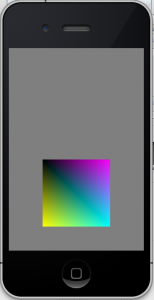
    you will see the iPhone simulator running your project

    The code that makes this work is already done for you. Now you are ready to begin modifying and adding your own files.
  10. If for some reason you cannot find something such as the [Run] button, you can go to View menu that is on the top of your screen and select which part you wish to hide or show


Check for the next part of this tutorial. We shall start analyzing the basic files that Xcode generates for your example to work.

(iOS Programming – Part 2) Next >

Notification

These examples are provided for educational purposes. Using this code is under your own responsibility and risk. The code and information is given ‘as is’. I do not take responsibilities of how they are used.
Share
Leave a comment

Going from C++ to Objective-C 2.0 – Part 1

NOTIFICATION: These examples are provided for educational purposes. Using this code is under your own responsibility and risk. The code is given ‘as is’. I do not take responsibilities of how they are used.
This tutorial assume that you have some experience with C++ and concepts of Programming Languages.

Basic differences between objective-C and C++:

  1. Keywords begin with the @ character, for example: @class, @try, @catch, etc.
  2. Boolean type is BOOL (instead of bool as in C++). They can be set as YES or NO
  3. Every object is of type id
  4. Classes:
    1. They are objects.
    2. They are instances of a meta-class (root class).
      1. This means that they can be dynamically managed
    3. You can create instances base on the name class
    4. Add classes at run-time
    5. Ask methods from the class
    6. Equivalent to C++ Run-Time Type Information (RTTI) but more powerful and with out the lack of portability issues related with RTTI.
    7. Objective-C defines a root class, NSObject. Every new class should be derived from this class.
    8. Since classes are meta-class instances (objects), it is possible to declare a pointer to them.
  5. nil is the equivalent of NULL in C++ for an object pointer; however, do not interchange nil and NULL
  6. The equivalent of nil for a class pointer is Nil.
  7. Interface code of a class goes in .h files
  8. Implementation code of a class goes in .m files
  9. Implementation code of a class in Objective-C/C++ goes in .mm files
  10. Directive #import replace directive #include.
    1. The directive #importinclude already the compilation guards normally used in C++, example:
      #ifdef COMPILATION_GUARD_H
      #define COMPILATION_GUARD_H
      ...
      /* code */
      ...
      #endif // COMPILATION_GUARD_H
  11. As standard, all class names begin with the prefix NS, example: NSString
  12. Calling a method is done by using the following syntax:
    [my_object do_something]

    instead of using this syntax as in C++:

    my_object.do_something();
  13. Objects:
    1. All of them should be of type NSObject
    2. Every pointer to an object should be declared as NSObject*
      1. Using type id is a short way to declare a pointer to an object plus it provides with a dynamic-type checking
    3. Null object pointers should be set to nil (instead of NULL as in C++)
  14. Instance data are the equivalent to attributes in C++.
  15. Methods are the equivalent to member functions in C++.
  16. Instances data and Methods cannot be mixed as they are in C++
    1. Attributes are declared in braces while their implementation lies inside the @implementation block.
      1. This allow the implementation of some methods without being exposed in the interface
    2. The prefix “” indicate instance methods while the prefix “+” indicate a class method (staticin C++).
      1. These prefixes should not be confused with private and public keywords of C++.
      2. These prefixes have nothing to do with UML “-” and “+” symbols
    3. Type of parameters are enclosed in parenthesis ()
      1. Parameters are separated with colons “:
    4. @interface keywords is the equivalent to the class keyword in C++
      1. Do not confuse with @class keyword which is used only for forward declarations
    5. Example:
      1. In C++:
        class Base{
          private:
            int value;
          public:
            int getValue();
            void setValue(int new_value);
        };
        ...
        int Base::getValue(){  return value; }
        void Base::setValue(int new_value){ value = new_value; }
      2. In Objective-C:
        @interface Base : NSObject{
          int value;
        }
        -(int) getValue;
        -(void) setValueFrownint) new_value;
        @end
        
        @implementation Base
        -(int) getValue { return value; }
        -(void) setValueFrownint) new_value{ value = new_value;}
        @end
  17. Forward declarations in Objective-C are done by using the keyword @class
    1. @protocol keyword can be also being used
    2. Example:
      1. Forward declaration in C++:
        // car.h
        #ifndef CARLSTEIN_CAR_H
        #define CARLSTEIN_CAR_H
        
        class Motor; // Forward declaration
        class Car{
          private:
            Motor *motor;
          public:
            void start();
        };
        void Car::start() { ... }
        #endif // CARLSTEIN_CAR_H
      2. Forward declaration in Objective-C:
        // car.h
        @class NSMotor; // Forward declaration
        @interface NSCar : NSObject{
          NSMotor *motor;
        }
        -(void) start;
        @end
        @implementation NSCar
        -(void) start {...}
        @end
  18. Public, private and protected:
    1. In C++, attributes and methods can be public, private (default mode), and protected.
    2. In Objective-C, methods can only be public.
      1. However, it is possible to ‘mimic’ the private mode for methods by declaring these methods inside @implementation without declaring them inside @interface.
        1. Using this trick make the methods less exposed but they can still being called.
    3. Instance data can be public, private, and protected (default mode).
    4. Inheritance can only be public, it cannot be tagged as public, private, or protected.
    5. Example:
      1. In C++:
        class Car{
          private:
            Motor *motor;
            void start_computer();
          public:
            Accessory *accessory;
            void start();
          protected:
            ExternalSensor *ext_sensor;
            void check_sensors(int number, char type);
        };
      2. In Objective-C:
        @interface Car : NSObject
        {
          @private:
            NSMotor *motor;
        
          @public:
            NSAccesory *accessory;
        
          @protected:
            ExternalSensor *ext_sensor;
        }
        
        -(void) start_computer;
        -(void) start;
        -(void) check_sensors : (int) number : (char) type;
        
        @end
  19. As you can see in the previous example:
    1. The return type of a method is enclosed by parenthesis ()
    2. All parameters are separated by colons “:
    3. ” prefix is to indicate an instance method
    4. +” prefix is to indicate a class method (static in C++)
    5. Remember that methods are always public
  20. Declaring a class data attribute such as staticin C++ is not possible; however, we can be ‘mimic’ it:
    1. In the implementation file, use a global variable.
    2. By using accessors on it, the class can use the variable with class methods or normal methods.
    3. In the initialize method of the class, the variable can be initialized.
  21. When working with prototypes, calls, instance methods and class methods have in consideration:
    1. The return type of a method is enclosed by parenthesis ()
    2. Parameters are separated by colons “:
    3. Method’s name and attribute’s name can be the same (normally this is use for creating getters)
      1. A label can be associated with parameters. This label is a name specified before the colon “:” and become part of the name of the method plus modifies it.
      2. The first parameter must not have a label since the name of the method is already the label.
    4. In Objective-C, we do not say that we call a method but that we send a message to the method.
    5. Example:
      1. In C++:
        //prototype
        class Base{
         ...
         insertObjectAt(void *, size_t);
        }
        ...
        void Base::insertObjectAt(void *obj, size_t index)
        ...
        Base shelf;
        shelf.insertObjectAt(new_object, 9);
      2. In Objective-C:
        1. Without using label:
          @interface Base : NSObject{
          ...
          }
          ...
          //prototype
          -(void) insertObjectAtFrownid)objFrownsize_t)index
          @end
          ...
          Base shelf;
          [shelf insertObjectAt:new_object:9];
        2. With using label:
          @instance Base : NSObject{
          ...
          }
          ...
          //prototype.
          -(void) insertObjectFrownid)obj atIndexFrownsize_t)index
          @end
          ...
          Base shelf;
          // This is easier to read
          [shelf insertObject:new_object atIndex:9]; // This WORKS!
          // This fails plus it is not easier to read
          [shelf insertObject:new_object:9];         // This FAILS!
  22. self keyword is the equivalent of thiskeyword of C++
    1. Unlike this keyword in C++, self is not a real keyword and its value can be changed (useful in constructors).
    2. self is a hidden parameter which each method receives. The value of this hidden parameter is normally the current object.
    3. Example:
    4. In C++:
      class Point {
        private:
          int x;
          int y;
        public:
          void setInterceptY(int new_y);
      };
      
      void Point::setInterceptY(int new_y) {
        x = 1;
        int y;
        ...
        y = new_y >> 1; // local y
        ...
        this->y = y;    // object's y
      }
    5. In Objective-C:
      @interface Point : NSObject
      {
        int x;
        int y;
      }
      -(void) setInterceptY : (int) new_y;
      @end
      
      @implementation Point
      -(void) setInterceptY : (int) new_y {
        x = 1;
        int y;
        ...
        y = new_y >> 1; // local y
        ...
        self->y = y;    // object's y
      }
      @end
Share
Leave a comment