WinJS: SplitView and Custom Navigation

First, I would like to thanks the “anonymous” person who requested me if I could give him an example on how to apply navigation to the SplitView.
 
I created a class that allows navigation using the SplitView example given in this link.

index.html

<!DOCTYPE html>
<html>
<head>
    <meta charset="utf-8" />
    <title>App1</title>

    <!--- Download the last version of WinJS --->
    <link href="lib/WinJS_4.3/css/ui-dark.css" rel="stylesheet" />
    <script src="lib/WinJS_4.3/js/base.js"></script>
    <script src="lib/WinJS_4.3/js/ui.js"></script>
    <link href="css/default.css" rel="stylesheet" />

    <!--- This is where the custom NavigationClass will recide ---> 
    <script src="js/navigation.js"></script>

    <script src="js/main.js"></script>

</head>
<body class="win-type-body">
    <div id="app">
        <div class="splitView" data-win-control="WinJS.UI.SplitView">
            <!-- Pane area -->
            <div>
                <div class="header">
                    <button class="win-splitviewpanetoggle"
                            data-win-control="WinJS.UI.SplitViewPaneToggle"
                            data-win-options="{ splitView: select('.splitView') }"></button>
                    <div class="title">
                        <h3 class="win-h3">SplitView Pane Area</h3>
                    </div>
                </div>

                <div class="nav-commands">
                    <!--- Added selector id to identify the menu items --->
                    <div id="menuItemHome" data-win-control="WinJS.UI.SplitViewCommand" data-win-options="{ label: 'Home', icon: 'home'}"></div>
                    <div id="menuItemTime" data-win-control="WinJS.UI.SplitViewCommand" data-win-options="{ label: 'Time', icon: 'clock'}"></div>
                </div>
            </div>

            <!-- Content area -->
           <!-- added a unique identification to the contentArea" which would be used by our navigation class -->
            <div id="contentArea" class="contenttext">
                <h2 class="win-h2">SplitView Content Area</h2>
            </div>
        </div>
    </div>
</body>
</html>

home.html

<!DOCTYPE html>
<html>
<head>
    <tiutle>Home</title>
</head>
<body>
    <div>Home content</div>
</body>
</html>

time.html

<!DOCTYPE html>
<html>
<head>
    <title>Time</title>
</head>
<body>
    <div>Time</div>
</body>
</html>

Now, that we have the basics, here is an example of the Navigation Class I created. This is just a draft but it does the job.

js/navigation.js

"use strict";

var _navigationClass = _navigationClass || {};

_navigationClass.constructor = function (contentAreaSelector, menuItems) {
    console.log("Navigation Constructor(" + contentAreaSelector + ", " + menuItems + ")");
    this._contentAreaSelector = contentAreaSelector;
    this._contentArea = document.querySelector(contentAreaSelector);
    this._menuItems = menuItems;
    this.update();
};

_navigationClass.instanceMembers = {
    addSplitView: function(){
        var splitView = document.querySelector(".splitView").winControl;
        new WinJS.UI._WinKeyboard(splitView.paneElement); // Temporary workaround: Draw keyboard focus visuals on NavBarCommands
    },
    resetContentArea: function () {
        this._contentArea.innerHTML = "";
    },
    render: function(url) {
        var self = this;
        console.log("render(url: " + url + ", contentArea:" + self.contentArea);
        if (url === undefined || self._contentArea === undefined) return;       
        WinJS.UI.Fragments.renderCopy(url, self._contentArea)
        .done(function () {
        }, function (error) {
            console.log("Error loading [" + url + "] in [" + self._contentArea.getAttribute("id") + "]: " + error);
        });
    },
    addEventListener: function (event, menuItemSelector, url) {
        console.log("addEventListener('" + event + "', " + menuItemSelector + ", " + url + ")");
        var self = this;
        if (event === undefined || menuItemSelector === undefined || url === undefined) return;
        var menuItem = document.getElementById(menuItemSelector);
        menuItem.addEventListener(event, function () {
            self.resetContentArea();
            self.render(url);
        });
    },
    update: function () {
        console.log("update()");
        var self = this;
        if (self._contentArea === undefined || self._menuItems === undefined) return;
        console.log(self._menuItems);
        var list = new WinJS.Binding.List(self._menuItems);
        list.forEach(function (value, index, array) {
            value.default = (value.default === undefined) ? false : value.default;
            console.log("[url: " + value.url + "] [menuItemSelector: " + value.menuItemSelector + "] [default: " + value.default);
            
            if (value.default){
                self.resetContentArea();
                self.render(value.url);
            }
            self.addEventListener("click", value.menuItemSelector, value.url);
        });
    },
    contentAreaSelector: {
        get: function () {
            return this._contentAreaSelector;
        },
        set: function (newContentAreaSelector) {
            if (newContentAreaSelector === undefined) return;
            this._contentAreaSelector = newContentAreaSelector;
        }
    }
};

_navigationClass.staticAndPrivateMembers = {
    TypeName: "NavigationClass"
};

var NavigationClass = WinJS.Class.define(_navigationClass.constructor, _navigationClass.instanceMembers, _navigationClass.staticAndPrivateMembers);
  • If you need to understand how to create a WinJS class go to this link.
  • If you need to understand how to use inheritance with WinJS then go to this link

This class takes two parameters in the constructor. The first parameter is the content area to fill, the second is an array of JSON objects. Each JSON object will have the following properties which are the url to load in the content area, the selector to which add the listener event click. In this way, whatever is the selector click on, it will render the content of the url provided. The third property is default, which indicates the class which url should be loaded as a default.

Below is how do you apply the SplitView and this NavigationClass.

js/main.js

// For an introduction to the Blank template, see the following documentation:
// http://go.microsoft.com/fwlink/?LinkId=232509

(function () {
	"use strict";

	var app = WinJS.Application;
	var activation = Windows.ApplicationModel.Activation;
	var isFirstActivation = true;

	app.onactivated = function (args) {
		if (args.detail.kind === activation.ActivationKind.voiceCommand) {
			// TODO: Handle relevant ActivationKinds. For example, if your app can be started by voice commands,
			// this is a good place to decide whether to populate an input field or choose a different initial view.
		}
		else if (args.detail.kind === activation.ActivationKind.launch) {
			// A Launch activation happens when the user launches your app via the tile
			// or invokes a toast notification by clicking or tapping on the body.
			if (args.detail.arguments) {
				// TODO: If the app supports toasts, use this value from the toast payload to determine where in the app
				// to take the user in response to them invoking a toast notification.
			}
			else if (args.detail.previousExecutionState === activation.ApplicationExecutionState.terminated) {
				// TODO: This application had been suspended and was then terminated to reclaim memory.
				// To create a smooth user experience, restore application state here so that it looks like the app never stopped running.
				// Note: You may want to record the time when the app was last suspended and only restore state if they've returned after a short period.
			}

		}

		if (!args.detail.prelaunchActivated) {
			// TODO: If prelaunchActivated were true, it would mean the app was prelaunched in the background as an optimization.
			// In that case it would be suspended shortly thereafter.
			// Any long-running operations (like expensive network or disk I/O) or changes to user state which occur at launch
			// should be done here (to avoid doing them in the prelaunch case).
			// Alternatively, this work can be done in a resume or visibilitychanged handler.
		}

		if (isFirstActivation) {
			// TODO: The app was activated and had not been running. Do general startup initialization here.
			document.addEventListener("visibilitychange", onVisibilityChanged);
			args.setPromise(WinJS.UI.processAll());
		}

		isFirstActivation = false;

		WinJS.UI.processAll().done(function () {
		    addSplitViewAndNavigation();
		});

	};

	function addSplitViewAndNavigation() {
            // First add the splitView functionality as instructed.
	    var splitView = document.querySelector(".splitView").winControl;
	    new WinJS.UI._WinKeyboard(splitView.paneElement); // Temporary workaround: Draw keyboard focus visuals on NavBarCommands
          
            // Then, define the urls and respective selectors. In this case, we are using the menu items
	    var menuItems = [
            { url: "home.html", menuItemSelector: "menuItemHome", default: true },
            { url: "time.html", menuItemSelector: "menuItemTime" },
	    ];

	    var navigationObj = new NavigationClass("#contentArea", menuItems);
	}

	function onVisibilityChanged(args) {
		if (!document.hidden) {
			// TODO: The app just became visible. This may be a good time to refresh the view.
		}
	}

	app.oncheckpoint = function (args) {
		// TODO: This application is about to be suspended. Save any state that needs to persist across suspensions here.
		// You might use the WinJS.Application.sessionState object, which is automatically saved and restored across suspension.
		// If you need to complete an asynchronous operation before your application is suspended, call args.setPromise().
	};

	app.start();

})();


It would be optimal to “piggy back” on the data-win-options, in this way we make it clean for the user. 

<div data-win-control="WinJS.UI.SplitViewCommand" data-win-options="{ label: 'Home', icon: 'home', url: 'home.html'}"></div>

However, I am not going to go over this on this post. In the near future, I will write a post on how to modify this class to “piggy back” on data-win-options.
I leave it to you as an interesing homework. Have fun! 


Share
Leave a comment

WinJS: Deriving Classes (Inheritance)

Deriving a Class (Inheritance)

We got this new class example:

var NewClass = WinJS.Class.define(function(value){
  console.log("NewClass constructor");
  this.field_value = value;
}, 
{ // Methods, properties and fields. Instance members.
  method_log_hello: function(){
    console.log("NewClass method log hello: Hello world");
  },
  property_field_value: {
    get: function(){ return this.field_value; },
    set: function(new_value){ this.field_value = new_value; }
  }
}, {
  // Static member - private member
   _counter: 0,
   counter_value: function () {
     return _counter++;
   }
});

And we wish to derive such class; therefore, we are going to do the following:

var NewSubClass = WinJS.Class.derive(NewClass, function(new_value, new_second_value){
  console.log("NewSubClass constructor");
  NewClass.call(this, new_value); // This is the equivalent to super in other languages.
  this.field_second_value = new_second_value;
}, { // Instance members
  new_method_log: function(){
    console.log("NewSubClass new_method()");
  }
},{ // Static and private members
  _second_counter = 0,
 second_counter_value: function () {
    return _counter++;
  }
}

Overriding Method

NewSubClass.prototype.method_log_hello = function(){
  NewClass.prototype.method_log_hello.call(this);  // Invoking original method we are overriding.
  console.log("NewSubClass method log hello! (overriden original method)");
};

To learn more about inheritance on Javascript you can go to this link


Share
Leave a comment

WinJS: Classes


Defining a Class

var NewClass = WinJS.Class.define(function(value){
  console.log("NewClass constructor");
  this.field_value = value;
}, 
{ // Methods, properties and fields. Instance members.
  method_log_hello: function(){
    console.log("NewClass method log hello: Hello world");
  },
  property_field_value: {
    get: function(){ return this.field_value; },
    set: function(new_value){ this.field_value = new_value; }
  }
}, {
  // Static member - private member
   _counter: 0,
   counter_value: function () {
     return _counter++;
   }
});

Alternative Way to Define a Class

var newClassConstructor = function(value){
  console.log("NewClass constructor");
  this.field_value = value;
};

var newClassMethods = { // Methods, properties and fields. Instance members.
  method_log_hello: function(){
    console.log("NewClass method log hello: Hello world");
  },
  property_field_value: {
    get: function(){ return this.field_value; },
    set: function(new_value){ this.field_value = new_value; }
  }
};

var newClassStaticAndPrivateMembers = {
  // Static member - private member
   _counter: 0,
   counter_value: function () {
     return _counter++;
   }
};

var NewClass = WinJS.Class.define(newClassConstructor, newClassMethods, newClassStaticAndPrivateMembers);

JavaScript Equivalent

function NewClass(value){
  console.log("NewClass Contructor");
  this.field_value = value;
}

// Instance member -  method
NewClass.prototype.method_log_hello = function(){
  console.log("NewClass method log hello: Hello world");
};

// Instance member - property
Object.defineProperty(NewClass.prototype, "property_field_value", {
   get: function(){ return this.field_value; },
   set: function(new_value){ this.field_value = new_value; }
});

// Static member - private member
NewClass._counter = 0;
NewClass.counter_value = function () {
 return _counter++;
};


Share
Leave a comment

NodeJS Tutorial: Part 3

If you wish to go to the beginning, were go over installation, basic settings, and package versioning, then go here [link]
This is the continuation of the previous part of this tutorial [link] were we when over installation, basic settings, and package versioning.


While NodeJS is great for REST calls using JSON, we are going to play with bootstrap templates. Later on, I will include a section focuses on REST calls.

There are different places were you can go to obtain open source templates such as Start Bootstrap [link], Bootstrap Zero [link], and Bootstrap Made [link]. Doing a search in you favorite search engine must pop many of them.

 icon-warning Make sure to read the license of those templates. There are some of them that you can’t use for your purposes.

In this case, I went into Start Bootstrap [link], search for a single column template, and downloaded “1 Col Portfolio” [link]. Before downloading, I went into the source [link] and took a look to the LICENSE file. It seems that David T. Miller [link], the author of this template, was nice to use an MIT license. This license allow us to obtain a copy without restriction and limitations. Thanks David for your contribution.

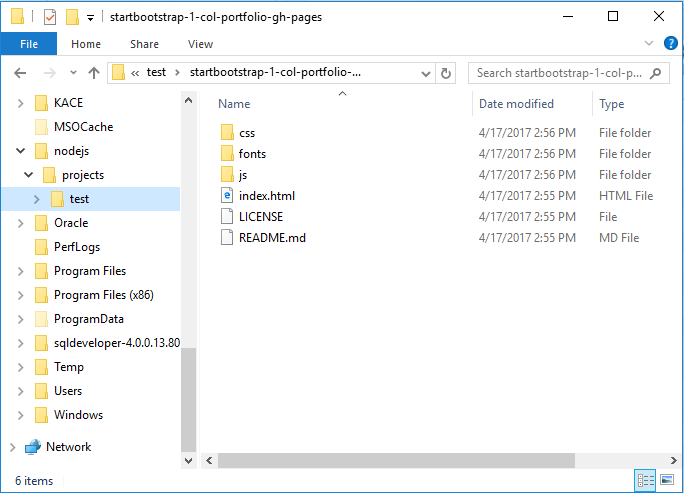
So, we downloaded the zip file and unzip it. In the content, we have these files:

So, we need to move these files to locations were can be of our use.

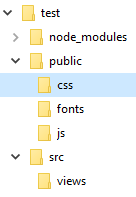
On the root folder of our application, I will create a public folder were I will move the css, fonts, and js folders. Also, I will create a src folder and inside a views folder were the index.html will be moved. The reason I am doing this is because that is the way I learned from the tutorial Building Web Applications with Node.js and Express 4.0 [link] made by Jonathan Mill [link]; however, you or your company may have a different way to do this. Now, that we have this in place, we need to do some routing.

Routing: Public Folder

Our public folder is were all our static CSS, JavaScript, and Fonts files are residing. We need to allow access to them in order to our website to work. This means that we need to do some routing in our part. In this case, we are going to set up our public directory as a static directory.

We are going to apply some middleware and set an static directory:

app.use(express.static('public'));

So any request made for anything in the public content, such as the css file, Express will take a look into that public directory and check if the static file is there and response its content.

Since we are at it, let’s do the same for our views:

app.use(express.static('src/views'));

Since these two lines are before our routing, Express will look into those static folders before executing any other routing we have.
If it find a static file, it will use that file, else it will continue with the routing we listed below.

Put this line before the routing lines:

var express = require('express');
var app = express();
var port = 8100;

app.use(express.static('public'));
app.use(express.static('src/views'));

app.listen(port, function(error){
	console.log("Running Server...");
	console.log("Port: " + port);
});

app.get("/", function(request, response){
	res.send("<html><body><h1>Welcome</h1></body></html>");
});

If you run your application go to your browser and do http://localhost:8100/css/bootstrap.css, you will get the content of that file displayed in your browser.


Share
Leave a comment

NodeJS Tutorial: Part 2

This is the continuation of the previous part of this tutorial [link] were we when over installation, basic settings, and package versioning.

Express: Setup

On the previous part [link], we showed the installation of the package Express. Express is a fast, minimalist web framework built for NodeJS.

First, we need to create a JavaScript file with the main part of our program. In this case, we create the file app.js with this line:

var express = require('express');

The method required give us a reference that points to the dependency package Express. However, this doesn’t provide us anything that we can use until we create an instance of Express.

var express = require('express');

var app = express();

Now, we can start working!


First Application

Lets build an application that listen to an specific port:

var express = require('express');
var app = express();
var port = 8100

app.listen(port, function(error){
  console.log("Running Server...");
  console.log("Port: " + port);
});

 Go to the command prompt and run your application as follow:

C:\nodejs\projects\test>node index.js
Running Server...
Port: 8100
 icon-warning  Use [Ctrl] + [C] to exit

I agree. This isn’t very impressive so far. Don’t worry. We will add stuff into it to make it more appealed.

Right now, before we move on, lets us go over Execution Scripts.

Execution Script

If you open package.json, there is the following lines:

  "scripts": {
    "test": "echo \"Error: no test specified\" && exit 1"
  },

Each key-value under scripts, in this case “test” is the key and “echo \”Error: no test specified\” && exit 1″ is the value, is a command that can be use when using npm to run out application. 

C:\nodejs\projects\test>npm test

> test@1.0.0 test C:\nodejs\projects\test
> echo "Error: no test specified" && exit 1

"Error: no test specified"
npm ERR! Test failed.  See above for more details.

Now, imagine that you create multiple js files, let’s say 100 js files. How people would know which one should they execute first? Well, we can use package.js to add our own key-value that points out which js file should be executed.

Add the following:

"scripts": {
  "test": "echo \"Error: no test specified\" && exit 1",
  "start": "node index.js"
},

Now, we can use npm start to run our application:

C:\nodejs\projects\test>npm start

> test@1.0.0 start C:\nodejs\projects\test
> node index.js

Running Server...
Port: 8100

First Application (Continued)

In order to interact with our application, we are going to need to introduce some entry point so there can be a communication.
Using the method “get”, we are going to provide a routing url “/” and the method that will be executed when we use such url.

This function will have two parameters, the first parameter will the the request and the second the response.
We get information from the request, and we provide information with response.

var express = require('express');
var app = express();
var port = 8100;

app.listen(port, function(error){
	console.log("Running Server...");
	console.log("Port: " + port);
});

app.get("/", function(request, response){
	res.send("<html><body><h1>Welcome</h1></body></html>");
});

Now, lets run our application and open our browser. In our browser, we are going to use the following URL: http://localhost:8100/

You could add other URLs as you see fit:

app.get("/contact_us", function(request, response){
	res.send("<html><body><h1>Contact Us</h1></body></html>");
});

app.get("/feedback", function(request, response){
	res.send("<html><body><h1>Feedback</h1></body></html>");
});

In this way, we can do the routing to different responses based on the urls.

So far, so good.


Share
Leave a comment